How to Swing a Golf Club Properly
Learning how to swing a golf club can be a joyous experience for anyone eager to learn.
Yes, the game can be frustrating and golfers struggle, but putting in the work and seeing positive results makes that effort worthwhile.
In this article, we’ll show you a step-by-step guide on how to swing a golf club like the pros, teaching you proper ball position, creating an athletic position at address, and how to fully create a swing that lasts for a lifetime.
Table of Contents
CHAPTER 1
Building the Proper Golf Grip
Everything about the golf swing starts with building the right golf grip. There are two types of grips: an overlap grip or an interlocking grip.
The overlap grip takes the bottom hand’s pinky and rests it on top of where the middle finger and index finger meet on the top hand.
In the interlocking grip, the finger goes between the middle and index finger to create a tough to break connection.
After you choose a type of grip, the placement of the golf club is crucial. Too many amateurs tuck the club’s grip along the palms of both hands.
But golf instructors typically want beginners to use more of their fingers to help reduce tension and decrease weak contact with the ball.
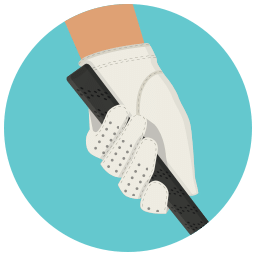
First, grip the golf club with your top hand. Next, place the bottom of the grip along the center pads of the fingers with the thumb positioned to the right side of the grip if you are a right-handed golfer.
Keep the thumb closer to the palm rather than extending down the club’s grip.
Now, with the bottom hand, interlock or overlap your pinky, then place the grip along the center pads of those remaining fingers.
Take the bottom thumb and put it on the left side of the grip. That thumb should not press against the grip or influence pressure in any way. Simply let the thumb rest along the top of the club’s grip.
Don’t be afraid to readjust the grip at address until you feel comfortable with the golf club in your hands.
If you’ll pay particular attention to golfers like Tiger Woods, they re-grip the club several times at address before starting their swing.

PRO TIP
If you are struggling to get comfortable with a specific grip, use a grip trainer that snaps onto the club’s grip. These trainers help you place your hands in the right position by guiding them through a mold on the device.
The great thing about the trainer is that you can hit balls with it on the actual club. Once you become more comfortable with the grip, then you can remove the trainer.
CHAPTER 2
Address
When standing at address, you want a natural stance with a straight spine angle that promotes a clean golf posture that allows the body to move freely with the swing.
Both feet should remain even for beginners. If you are playing an iron, the back foot should remain underneath the shoulder.
If you are hitting a driver or fairway wood, you want the back foot outside the right shoulder for greater power, especially when you need a big swing.
When looking at the lower body, you want to lower your backside slightly and lean forward from the hips.
You should flex your knees slightly at address, maintaining an athletic position with the golf club directly behind the golf ball. Keeping the knees bent also helps with the backswing and making a full turn away from the ball.
The front shoulder should be even across from the back shoulder. Flaring out or closing the lead shoulder can create either an unintentional slice or hook, so you want to avoid that when first learning the golf swing.
As the club head rests behind the ball, you need to move your hands slightly ahead of the impact point with a straight left arm to encourage compression and shot height.

PRO TIP
Take an alignment stick and lay it on the ground. Then use the stick to even out your toes and pretend to address the golf ball. You want to ensure that your toes and shoulders are even as you stand and your body is balanced.
Next, take practice swings imagining your shot heading along the target line created by the alignment stick.
CHAPTER 3
The Takeaway
The club head should move straight back on the early part of the takeaway as the golf club moves naturally to the waist. The body weight shifts slightly onto the inner part of the right foot during this movement.
A great way to picture the backswing is by looking to stretch the upper body away from the golf ball.
The left wrist and left arm extend and stay flat as the club leaves the ball, while the right arm and right elbow begin to flex as the weight moves onto the back foot.
As the club shaft reaches the waist, the club face should be slightly closed, rather than the club head pointing straight toward the sky.
This club position will help beginners get the club back to the golf ball in a square position.
The upper body rotation signals the beginning of the backswing.

PRO TIP
Place a golf ball behind the club head. As you take away the club, the ball should roll directly backward. If the ball rolls to either side of the imaginary line, then you are either dragging the club too far inside or too far outside.
This drill is excellent for the indoors because you aren’t taking full swing, just working on your takeaway.
CHAPTER 4
Backswing
The golf backswing is vital to getting the club into the right position for the downswing.
For the right-handed player, the backswing isn’t complete until the weight moves onto the inner half of the right leg and the front arm is fully extended with the shoulder under the chin.
As the club reaches the waist, you should start to rotate your back away from the target line.
This move coils the strength over the back leg, helping you generate the power that creates distance after impact. With the right knee slightly flexed, the back leg anchors the backswing as your head stays behind the ball.
You are working on getting the club’s shaft parallel at the top of the backswing, but it’s okay to stop the club where you feel comfortable to trigger the downswing.

PRO TIP
Take a longer towel and place both ends under the armpits, tightening the towel across the chest.
Next, take the golf club and make half swings. You want to feel how the arms work with the body without dropping or losing the towel as you swing.
CHAPTER 5
Making Contact
As the club releases from the top of the swing, the weight moves back to the middle of the body. The left hip begins to rotate and open to give the club a path to get back to the ball.
When generating power, it is essential that the hands stay ahead of the club, moving back toward the belt buckle to create the lag needed to produce more swing speed.
The key for the downswing comes from the trailing arm. The right elbow needs to return to the area close to the right hip as the club approaches the golf ball.
Once the club face reaches the ball, your hands should be slightly ahead of the impact point, and you also want your left shoulder directly over the left knee.

PRO TIP
Start slow to understand how the face hits the golf ball. With irons, you are swinging slightly down on the ball. The only difference with woods is that you are meeting the ball on a slight upswing.
By taking loose half swings in the beginning, you learn how to sync the swing and find a natural rhythm that will carry you throughout your golfing journey.
CHAPTER 6
Follow-Through
After you’ve hit the golf ball, there’s still work to do. Much like throwing a football or baseball needs a proper follow-through, the golf swing needs an even, balanced finish.
If you watch golf on Sundays, every PGA Tour professional hits the golf ball with unbridled ferocity but they always finish in control after impact.
Although making good contact with the golf ball is the essential element, every section of the golf swing requires practice and focus.
In the end, you want to finish with the golf club behind the head with the shoulders even and the sternum and belt buckle pointed directly at the target.
Working on creating a balanced follow-through takes time, effort, and energy.
Unfortunately, many golfers don’t want to put in the time, further hindering their growth as a golfer.
After impact, the weight moves onto the left side of the body with the left foot and left heel acting as a grounding anchor.
CHAPTER 7
How to Swing a Golf Club FAQs
How to properly swing a golf iron?
To swing an iron, start with a balanced stance, feet shoulder width apart, and weight evenly distributed. The ball position is slightly forward for mid irons. Relax your grip and have the clubface square to the target.
On the backswing, keep your left arm straight (right-handed) and pivot your hips. Shift your weight forward on the downswing, and hit the ball first, then the ground.
Follow through completely, and stay balanced. Practice tempo and posture, and you’ll hit irons consistently and accurately.
What are the stages of the golf swing?
The golf swing has five stages: setup, backswing, transition, downswing, and follow-through.
At setup, make sure you’re aligned and in good posture.
In the backswing, rotate your shoulders and hinge your wrists, and keep your left arm straight.
In the transition, shift your weight from the back foot to the front.
On the downswing, lead with your hips and keep the club on the correct path. In the follow through you want momentum and balance, your body should be facing the target.
Each stage is important for consistency and power.
How to aim correctly in golf?
To aim correctly, align your body to the target line.
Start by having the clubface square to your target. Your feet, hips, and shoulders should be in a line parallel to the clubface, for right-handed players slightly left of the target.
Use alignment aids like club shafts or markers on the ground during practice. Focus on a small target like a specific patch of grass or a tree to hone your accuracy.
Consistency builds confidence and accuracy over time.
How should a beginner swing a golf swing?
A beginner should work on learning proper technique before ramping up their golf swing speed and looking to blast the ball down the fairway.
By taking the time to learn the golf swing the right way at the beginning of their golfing journey, they’ll save time down the road.
Finding a coach that can teach the proper way to swing a golf club can also reduce the learning curve for amateurs serious about learning to play the game the right way.
What are the 3 keys to the golf swing?
The three keys to a healthy golf swing are a balanced shoulder width stance, getting the club on a swing plane, and a complete follow-through after impact.
Maintaining a natural, athletic movement throughout the swing allows golfers to utilize their strength to drive the ball toward the target.
What are the 5 Steps to a solid golf swing?
1. Balance at Address
First, remember that putting together a good grip is half the battle for hitting golf shots. As you stand over the ball, your arms should be loose. Slight knee flex with your back straight, leaning forward from the hips.
2. Swing Freely
In the beginning, don’t worry too much about where the club’s going on the backswing. You want a natural, loose swing arc, especially as you are first learning how to swing a golf club.
While proper golf instruction will work on getting the club in the right position at the top of the swing, you need to hit a few thousand shots before you’re ready to be molded by a golf coach.
Have fun, stay loose, and focus on balance and fundamentals.
3. Full Turn, Right Shoulder Under Chin
The backswing isn’t complete until the lead shoulder is under the chin with your back to the target.
Once you are in this position, the downswing is triggered, and the body should uncoil into slotting the club on the plane and into the ball.
4. Correct Weight Transfer
As the weight moves to the back foot on the backswing, the weight transfers to the lead foot on the downswing.
If you are hitting behind the golf ball, known as “chunking,” chances are your weight is stuck on the downswing. Work on getting that lead shoulder over the front foot at impact.
5. Balanced Follow-Through
After accelerating the club face through the ball, you want to let the club naturally decelerate, finishing with the club behind the head and your weight stabilized on your front foot with the belt buckle facing the target.
The back should remain straight with the weight forward and positioned over the front foot.
