
How to Hit a Golf Ball: The Complete Guide
How to hit a golf ball straight and far is one of the most sought-after skills in golf.
Homer Kelly of the golf book The Golfing Machine deduced that there are potentially 24 different components to a golf swing, each having a myriad of variations for each.
He calculated there are roughly 446 quadrillion ways to hit a golf ball.
I may not show you all 446 quadrillion ways to hit the ball, but in the next 7 chapters, I will show you the essentials of how you make the golf ball travel far, straight, and with some POP!

What You Will Learn In This Post


CHAPTER 1
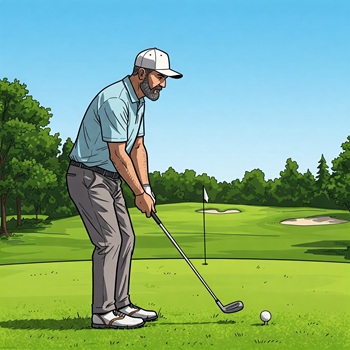
How to Stand to Hit a Golf Ball
Golfers come in all shapes, sizes, and ages from the 5’9” Corey Pavin to the gargantuan Dustin Johnson at 6’5” to the portly John Daly and chiseled Rory McIlroy.
Although there may be differences in their composition, they all have commonalities when they set up to a golf ball.
I’ve commonly heard the phrase “set up athletically to the golf ball” but what does that mean?
If you follow these simple instructions, you will be setting up athletically and prepared to hit a golf ball like a tour pro!

Practice Perfect Set Up
Step 1
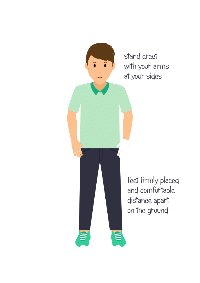
Without a golf club, stand erect with your arms at your sides and with your feet firmly placed on the ground with your feet separated a comfortable distance apart.
It is essential to determine a comfortable stance width first, as that will be your foundation for the rest of the setup. Things I like to see are the feet between hip or shoulder width apart.
Any wider or smaller and you will have a hard time moving athletically during your actual golf swing.
Step 2

Bend your knees.
Allow your legs to support the rest of your body in the set up, so be sure to add enough bend in your knees to allow you to be mobile.
If you have too little flex in your legs, your ability to generate a powerful swing will be reduced drastically.
If you have too much flex in your legs, you will have a hard time hitting the golf ball cleanly and potentially struggle to hit fat and chunky golf shots.
I recommend just enough flex to give you a bit of a bounce to your setup.
Step 3
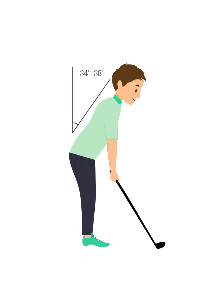
Bend from your hips and allow your spine to make an angle to the ground.
The best golfers in the world have been measured, and they typically bend over from their hips roughly 34 to 38 degrees.
Some golfers bend forward more like Masters Champion Zack Johnson, and some golfers bend over less like Rocco Mediate.
The key to this set is bending to a comfortable amount where you remain balanced and don’t fall or lean too far forward or too far backward.
Step 4
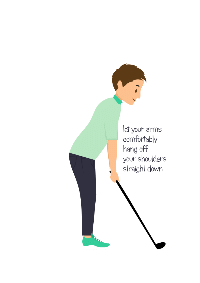
From your previous position, let your arms comfortably hang off your shoulders straight down.
This is the location that your hands naturally want to be in and that’s where they should be in your set up.
What you will notice is if you bent over a lot in Step 3, it is likely that your arms hang further away from your body than if you bent over less in Step 3 which would make your hands closer to your body at the set up position.
Set Up: Advance to Level Expert
Now that you have learned to stand to properly prepare yourself to hit a golf ball, here are a few important additions that will allow you to fine-tune your setup to create better golf shots.
Front Feet: I like to teach people to adjust their feet to match their physical ability.
It would be easier to finish your swing on your front foot by turning your front foot counterclockwise towards the target.
The further you turn it out, the easier it is to finish on your front foot, and it also takes away excess stress and strain on the front knee during the golf swing.
Trail Foot: Similar to the front foot, the trail foot will allow us to add and reduce our ability to turn during our golf swing.
If you were to turn your trail foot clockwise away from the target, you will notice an increase in rotation and mobility during your golf swing.
Experiment with both feet until you find your ideal position.
Alignment: Lastly, when we stand and set up a golf ball, we can do every step properly, but if we don’t align ourselves properly, it makes it impossible to hit the ball where we intend.
Ideally, when you set up to hit a golf ball, I would advise you to make sure your shoulders, hips, knees, and feet are all aligned parallel to the target you are attempting to hit.
As a visual, pretend you are hitting a golf ball on railroad tracks, with the ball on one track and your feet standing on the other.
If you repeat this visual, aligning yourself straight will become a simple task allowing you to hit more accurate golf shots.
CHAPTER 2
How to Hit a Golf Ball Straight with a Driver
Now that you know how to properly stand to hit a golf ball, how do we adapt that to a driver?
Do we do certain things differently than if we are hitting an iron or a wedge?
Do we stand further away because the club is longer? What do we do with the tee?
Tee it High? Tee it Low?
Let’s start from the ground and ball and work our way up to your body.
When we hit a golf driver, we can get a bit of a head start: The ball is already in the air because it is on a tee!
To properly tee up your golf ball, I recommend that the ball be no lower than the geometric center of the club face and no higher than one-half of the ball above the top of the golf club.
The reason we tee the golf ball up is that a driver has very little loft on the club face (roughly 8.5 to 12 degrees for most drivers).
That means it’s a lot harder to get the ball into the air than a sand wedge that has 56 degrees of loft.
So, to help get the ball in the air we place it on a tee to give it a bit of a head start!
Ball Position for Fairway Finding Drives!
Once the golf ball is on the tee, set it up using your setup from Chapter 1, and adjust where the ball is located between your feet.
If you haven’t noticed yet, the driver is the longest club in your golf bag, and you already know that the ball is perched up on a tee, so to help you make better contact, we will move the golf ball forward in your stance.
Shuffle your entire body to the side so that the golf ball is teed up near your lead foot.
If we were to move the golf ball to your back foot, it would force you to hit it while the driver is still moving down, making it even harder to get the ball into the air.
So the further forward we move the ball, the more up in the air the ball wants to travel with the driver.
Club and Arms Straight for Pin Point Accuracy
Now that the ball is in the proper position, let’s stay in our stance and adjust where the grip/handle of the club is located.
I like to see golfers when swinging their driver, have their lead arm, and the golf club creates a straight line.
What you will notice is if the grip end of the club points more at your belt buckle, the club face of the driver will point more to the left.
If you point the grip end of the club too far past your lead hip, the club face will point too far to the right.
But if you make a straight line between the ball, club, and your lead shoulder, you will have a very “square” or straightward pointing club face, which will help you create a shot that goes more accurately towards the target.
Add Tilt for Towering Drives
Lastly, to properly hit a golf ball with your driver, we are going to add one more piece to your set up and we call it “tilt”.
We mentioned before that we want the ball to go into the air with the driver, and the last piece to help create that high 300-yard drive is allowing your lead shoulder to be higher than your trail shoulder.
Imagine your golf partner poured a bottle of water on your lead shoulder, we want the water to drain off the opposite shoulder. The more tilt the more height your golf shots will have with the driver.
CHAPTER 3
How to Hit a Golf Ball with an Iron
I get asked this question again and again about how to hit an iron; how do you get the ball up into the air if the ball is sitting on the ground and not on a tee?
Unfortunately, with an iron there are no shortcuts like with a driver where the ball sits a few inches off the ground.
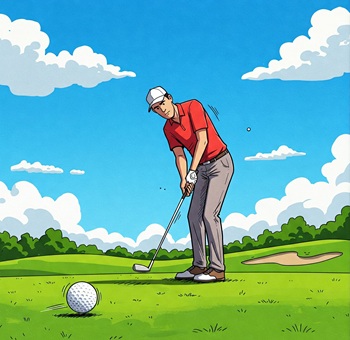
Low Point for Crisp Contact
To better understand the task we are trying to accomplish with an iron, let’s use a simple example of a hula hoop standing upright on the ground.
There is a point on the hula hoop that is currently touching the ground right?
If you were to trace the hula hoop with your finger as you move it further away from the point on the ground, your finger will begin to ascend higher and higher.
Well this is exactly what happens to the golf club as it makes a swing.
The club moves in a very large circular motion as you swing it. Ideally, there should be a point at that motion where the club makes contact with the ground (with a driver, we narrowly miss the ground!).
After the point strikes the ground, the club begins to ascend back into the air and around you.
When we used the tee in Chapter 2 for the driver, we also moved the tee towards our lead foot because the club had already found its lowest spot behind the ball and began ascending into the air again, helping us create the height needed for drives.
With an iron we actually want to place our ball closer to the middle of our stance or basically where the hula hoop would touch the ground. We call that the “Low Point” of our golf swing.
Handle and Hips: Move them Forward
The low point is very important for a golfer. It’s what makes the ball that sits on the grass get up into the air and onto the green!
Following the setup we talked about in Chapter 1, grab your iron and set up with the ball closer to the middle of your stance.
Once you have completed your basic setup, make some adjustments to hit crispy iron shots.
With the ball in the middle of your stance, go ahead and move the handle/grip end of the club lean toward the target until the ball, club, and lead all make a straight line.
If you move the ball further back in your stance, you will notice that the angle becomes more severe, and the further you move the ball forward, the less angle you will create.
Lastly while you are set up, push your hips and weight (about 55% or so) towards your front foot.
The reason for this is we need to strike the ball and the ground.
But if we set up with our weight too far on our trail foot, we will be more inclined to keep it there and most likely create a swing where the club hits the grass and turf first, which won’t make for a pretty-looking golf shot.
Hinge the Club to Nail Your Target
Now that you are set up and ready to hit great golf shots, what other things need to happen during your golf swing to allow you to hit the ball?
The piece that I feel is most important for creating successful golf shots would be your ability to hinge and unhinge the golf club.
A hinge is much like the motion you create to hit a nail with a hammer.
The hammer sits in your hand and you don’t just hold your arm straight out and move it up and down to hammer in a nail, there’s no power in that.
When you swing the hammer, you hinge the hammer with your wrist, and the hammer and your forearm create an angle or a lever for creating power and accuracy.
As you swing the hammer down, at some point, you release the lever, and the hammer crashes down on the nail at a point where your arm and hammer make a straight line. This is no different than what occurs in the golf swing.
If we merely set up the ball and swung the golf club with no hinge or lever, it would be powerless, like pounding that nail in from the previous example.
At some point in your backswing, we will incorporate a hinge that allows the golf club to travel more vertically so it can return to the golf ball on a slightly more descending angle instead of a shallow angle that may only skim the top of the ball.
Pro Tip: Pre Set Perfect Contact with this Drill
L to Straight Drill – A great drill to practice your hinging, low point control, and ball striking is the L to Straight Drill. To set up for the drill, get into your normal iron setup, and we will make some adjustments.
First, take all of your weight and move it to your front leg. This will ensure you don’t make any golf mistakes like moving backward in the swing. We want to preset everything to create a perfect impact.
Next, we will be making small waist height swings and when your golf club has reached roughly waist height your club and lead arm should create a 90 degree angle or “an L shape”.
If it does not, take a few minutes and work on repeating your waist height swing and incorporate a full hinge as if you are about to hit a nail with a hammer.
On the down swing, while on your lead foot swing the club down and practice unhinging the golf club and striking the ground and finishing shortly after the ground with both arms long and straight.
Can you strike the same spot on the ground repeatedly, or are you having trouble?
For a better visual, spray paint a line on the grass and see if your club is striking behind, in front, or on the line. Anything in front or on the line is perfect. Anything behind the line is not.
Practice this drill first with no golf ball until you can achieve consistent contact with the ground. Once that occurs, grab some balls and place them on the line.
Repeat the drill. But this time, the ball should shoot off the club face and into the air!
CHAPTER 3
CHAPTER 4
How to Hit a Golf Ball Straight and How to Hit a Golf Ball with Curvature
Chapters 1 through 3 take you through the process of setting up and actually hitting the golf ball.
If the golf game was played on a driving range, then we would all be tour pros.
But it’s not.
We actually have to get the ball into a hole, sometimes 600 yards away.
So accuracy is also a premium, along with merely hitting the ball.
To explain how the ball travels, we may need to brush up on our physics.
But I’ll keep it simple so all the Lehman’s can understand.

Club Head? Club Path? A Quick Breakdown
Two major components allow the golf ball to fly and what gives it its direction and curvature.
The king of this equation is the club head. More specifically, it is the direction the club head points when it strikes the golf ball.
If you placed a pencil on the club face with it sticking perpendicular to the club face, you would have a great visual of the direction the club face is pointing.
Now, place that club face directly behind the golf ball and look at it directly from about it. If you turn and twist the grip of the golf club, the pencil will move some degree left and right.
What you will notice is even the slightest movement makes the club head move some amount.
The reason this is important is that the DIRECTION THE CLUB HEAD IS POINTING AT THE MOMENT OF IMPACT IS THE DIRECTION THE GOLF BALL WILL BEGIN TO TAKE OFF IN.
If the club strikes the ball and is 5 degrees to the left, the ball will begin traveling 5 degrees to the left.
Banana Slice or Baby Draw? Why Some Balls Curve More
Now, you may be asking yourself why some golf balls curve more or less than others that I hit.
The larger the curvature on the golf ball means that there was a larger “Gap” between the degrees open or closed the clubface compared to the degrees the club is moving out to in or in to out.
For example, if you hit two golf balls and the club face was perfectly square at impact but one swing produced a 10-degree IN TO OUT swing and the other produced a swing that was 5 degrees IN TO OUT, the swing with 10 degrees would actually curve TWICE AS much to the left than the one with 5 degrees.
If we use the same example, this time, the golf club wasn’t aimed perfectly square at impact but 5 degrees to the right.
The golf shot that was struck 10 degrees IN TO OUT would create a flight where the ball would start 5 degrees to the RIGHT, and then, because of the swing path, the ball would actually curve back to the left and directly onto the target.
The shot with a 5-degree IN TO OUT swing path would produce a shot that starts 5 degrees to the right and stays straight in that direction with no curve.
5 degrees of club face and 5 degrees of swing path = straight shots. The more those two numbers get apart from each other the more curvature you will get on your golf shots.
Field Goal Practice
DRILL – Field Goals
A great drill for learning how the ball travels is the field goal drill.
Grab two alignment rods and walk about 5 to 6 yards away from where you are hitting golf balls and stick them in the ground vertically so they are roughly 5 to 6 feet away from each other.
Begin your practice session by merely attempting to hit your golf balls thru the “Uprights” and take note of where the golf ball is traveling.
Is the ball closer to one of the uprights? Is it right down the middle when it passes the sticks?
After it passes the sticks, is the golf ball doing anything else, like curving to the left or to the right?
Once you have mastered hitting it between the uprights, begin practicing curving the ball around the field goal.
Hit the ball to the right of the sticks and get the ball to land (visually) between the sticks. Then, hit the ball to the left of the field goal and practice curving the ball back in between the sticks.
With the knowledge of what you learned in Chapter 4 you will be able to determine if you need to adjust your club face or your swing path!
CHAPTER 5
How to Hit a Golf Ball Low
Don’t you wish you could set up on the tee box and rip a low stinger right down the middle of the fairway like the late 1990’s version of Tiger Woods?
Well, believe it or not, it’s not all that hard, and with a few minor adjustments, you can be a master of the low golf shot!
Lower Shots = More Fairways & Greens
The reason for wanting to change the trajectory of a golf shot will vary but the most common reason will be for weather and wind and also accuracy.
As the flight of the golf ball lowers, the ball has less time in the air to travel from side to side, so even on a non-perfect strike you wouldn’t be likely to see a large errant miss.
As weather and wind go, the higher you hit the golf ball, the more potential for errant shots that travel high and climb into the wind, which will create more lateral dispersion and poorer results.
The 6-Step Stinger Shot
Step 1: Set up your golf ball as if you are hitting an iron shot.
Step 2: Move the golf ball 6 to 12 inches BACK in your stance. The further back you go, the lower the ball flight you will achieve.
Step 3: Make sure the club handle is in front of the ball. Ideally, create a straight line with your lead arm.
Step 4: During your swing, make sure you create your L between the club and your lead arm. Without this, the shot won’t be possible.
Step 5: Make your downswing and attempt to unhinge your golf club as LATE AS POSSIBLE. This will create the least amount of loft on the club, resulting in the lowest possible flight for your golf shot.
Step 6: For this particular shot, we will be using a shorter abbreviated finish, roughly at waist height. This helps create the lowest flight possible as well.
Drill: The Triangle Of Success
Drill: Under the Stick/Gate Drill
A great drill to practice your low flying iron shots is a drill I like to show my students where they grab two alignment sticks and place them in the ground about 5 yards in front of your practice station.
When you place them in the ground, stick them in the ground on angles so it looks like you made a triangle / \.
After this, set up a few golf balls and practice hitting punch shots through the triangle. The taller you make the triangle the easier it is, the smaller and squattier the triangle the more difficult the drill becomes.
CHAPTER 6
How to Hit a Golf Ball High
Much like hitting the golf ball low, the easiest way to hit a golf ball high is to use the same basic principles as Chapter 5.
How To Hit It High & Let It Fly
Step 1: Set up your golf ball as if you are hitting an iron shot.
Step 2: Move the golf ball 6-12 inches UP in your stance. The FURTHER FORWARD, the HIGHER THE BALL FLIGHT you will achieve.
Step 3: Make sure the club handle is in line with the lead arm, but this time, it will appear the shaft has less angle to it, and the handle won’t be as far forward.
Step 4: During your swing, make sure you create your L between the club and your lead arm. Again, this is very important!
Step 5: Make your downswing. This time, we will unhinge our golf club as we normally do. We won’t try to hold off the unhinging like when hitting a low shot. By moving the ball forward, we created enough change for the ball to climb higher than before
Step 6: For this particular shot, we will use a much larger, fuller finish. I would exaggerate how high and far the club travels. You will begin to get comfortable with what finish works for you.
Climb The Ladder
Drill – Pool Noodle Ladder
A great drill I use when working on the trajectory is I take two alignment rods and put them about 3 feet apart from each other.
Then horizontally, I slide colorful pool noodles down the rods until I have a training aid that looks like a ladder.
From here, with your knowledge from Chapters 5 and 6, practice calling out your shots and hitting your golf ball high, low, and mid trajectories.
If you are practicing with a friend, play a golf game with them where you need to perform a shot.
If you accomplish it, your competitor needs to copy it as well. If they can’t do it, they get a G, and you continue till one player spells out GOLF.
CHAPTER 6
CHAPTER 7
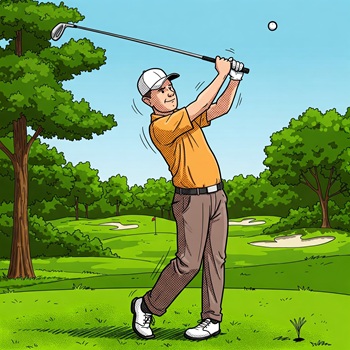
How to Hit a Golf Ball with More Power
Smash It with Smash Factor
There is a basic formula you can follow for generating more power to add distance to your golf game.
A good rule of thumb is to check on your Smash Factor. The term Smash Factor is essentially a ratio of Ball Speed (just after impact) to Club Head Speed.
This alone may not help you hit the ball with more power, but understanding those two variables is what does.
Club head speed is the velocity of the club head at the point it strikes the golf ball.
Many things affect the speed of the club head, but the most important are your ability to hinge and unhinge the golf club and also your ability to utilize the ground.
As explained in Chapter 3, creating a lever between your lead arm and the golf club will dramatically increase your ability to control the club’s low point and generate speed in a very small window of time. The same principle applies to hockey.
Less Turn, More Jump!
Lastly, your ability to use the ground is vitally important. Imagine playing another sport where you only used your upper body to slam dunk a basketball.
What if you couldn’t use your legs to throw a baseball? Well, the answer would most likely result in less explosiveness and an inability to perform the task efficiently.
Much like those sports, not using our lower body and, more specifically, our interaction with the ground will greatly affect our power in the golf swing.
Recently, with the use of force plates and pressure mats, we have been able to measure how little or aggressively a golfer pushes VERTICALLY off the ground while generating a golf swing.
We find that the golfers who create more force vertically hit the golf ball higher and further.
For example, take Major Champions Justin Thomas and Bubba Watson, they have the unique ability to get airborne in their swing. They are also traditionally some of the longer players on tour.
Slow-Motion Jump Shots
DRILL – A great way to practice your vertical force or Ground Reaction Force (GRF). I like to call it my pouncing cat drill.
Step1: Take your normal setup for a typical iron swing
Step 2: Take a swing to the top of your backswing
Step 3: Slowly lower your swing back down as if you are about to hit the ball, but stop when your club is about waist height
Step 4: Get into a deeper squat or sitting position and feel as if you are much too close to the ground and about to take the world’s largest divot.
Step 5: Use your athletic prowess to push vertically as if you are going to jump into the air and finish your full swing.
What you will notice is that you will almost always miss the ground and never chuck the shot or swing. That is due to the fact that you have coordinated your vertical forces or GRF.
Center of the Clubface + Club Head Speed = More Distance & Ball Speed
Ball Speed is merely a reading in MPH of how fast the ball travels off the clubface. You may think to yourself, “The faster the club head is moving, the faster the ball should go.” Unfortunately, that is not always the case.
BALL SPEED IS DIRECTLY RELATED TO WHERE ON THE FACE YOU STRIKE THE BALL (or centeredness of contact).
Ideally, every golf ball you hit will be in the geometric center of the clubface, but even the pros don’t do that on every shot.
So, as the ball gets struck closer to the toe or the heel of the golf club, the club head encounters some twisting or torque. This torque twists the clubface, resulting in slower ball speeds and added curvature (gear effect).
As the mishit becomes further away from the center, the more the ball speed slows down.
This is why the Smash Factor is an important measurement.
You can have an incredibly fast swing speed, but if you can’t find the center of the face, you will have a very low smash factor.
While a golfer who swings much slower but always hits the center of the face will have a much higher smash factor.
Essentially, the closer you can get your ratio of ball speed to club head speed to 1.5, the more efficient a swinger you are and the more likely you are to hit the ball further.
Drill – Gold Bond Spray
This is a simple drill for figuring out where on the club face you are hitting the golf ball.
Step 1: Go to your local grocery store or pharmacy and pick yourself up a can of “Foot Spray”
Step 2: While practicing, take the spray and apply it to the face of whatever club you are about to hit.
Step 3: Allow the powder to dry on the face of the club.
Step 4: Hit the Ball
Step 5: After the ball is struck, take a look at the clubface and what you see. There should be an imprint in the powder of where the ball hit the face. Was it in the center? Was it on the heel or toe?
Practice with the foot spray to get accustomed to where on the face you strike the ball and to also gain a sense of club face awareness.
After you can competently hit the face, practice purposely hitting the toe of the club, then practice hitting the ball closer to the heel of the club. Then, practice hitting the center again.
This skill is incredibly difficult to achieve. But when you can achieve it, you will be a ball-striking wizard.
If you follow these chapters, tips, and drills, you will be a ball-striking aficionado in no time. Finally, be a responsible golfer and always carry the best divot tools to keep the grounds in premium shape.
We recommend you check our full guide on golf ball cleaning tips.